

If you’ve sewn with knit fabrics, you may not know much about percentage of stretch, but I bet you know well it’s importance!
Let me explain . . . You made a t-shirt and it fit and looked fabulous on you. So, you made another one from a different knit fabric and it brought you to tears. It bagged and hung on you. Or it was so tight you couldn’t breathe. That’s the difference percentage of stretch makes. It’s the magic ingredient for successfully choosing a knit fabric and I want you to know how to measure it accurately!

The Usual Method
On the back of a pattern envelope that is designed for knit fabric, you’ll find a little ruler with instructions. In general terms it says “4” of fabric should stretch from here to here”. This fits nicely on the pattern back but, in my experience, 4” of fabric doesn’t usually give you an accurate measurement of percentage of stretch. So, let’s solve that!
The Better Method
My history with knits began more years ago than we will talk about, but it was a LONG time ago. I worked for a now defunct company called Stretch & Sew and taught classes in the “Stretch & Sew Method”. All knits, all the time! The training was excellent and I was taught successful knit sewing and pattern sizing and hacking techniques that I still use. There will be more on that in future posts, but today we’re going to tackle and conquer checking Percentage of Stretch! Are you ready?

Rather than the pattern standard of 4”, we’re going to work with 10”. This will give you a much better sample of the actual stretch of your fabric and it’s an easy number for percentage calculations. Also, fabric will stretch differently across a fold than it does along the cut edge of the fabric. This is important because we are essentially wearing an opened fold of fabric in our finished garment. We are not wearing cut edges except at the hems. Make sense?
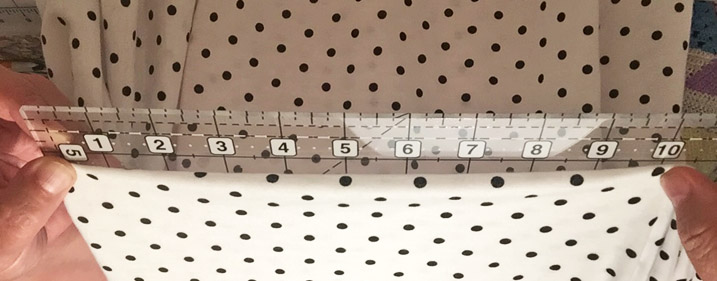
- Create a 10” fold straight across the width of your fabric, at least 10” up from the cut edge and 10″ away from the selvedge. (See my solid plum illustration above.)
- Hold the beginning of your fold securely at the end of a yardstick or ruler and stretch the other end gently, yet firmly beyond the 10” mark. (See the polka dot picture above.)
- If the 10″ fold of fabric stretches to 12.5”, you have 25% stretch. If it stretches to 15”, it has 50% stretch, to 17.5”, it has 75% stretch and to 20”, it has 100% stretch.
- Repeat this for the length of your fabric, too. Patterns often call for two or four way stretch, so check both. You’ll want to know the percentage of stretch across the length and width of your lovely knit fabric!

A Little Gift
And, because I want this to be as easy as possible for you, I made you a chart! You can print this, laminate it, carry it in your purse or keep it with your sewing supplies. All I ask is that you smile and quietly whisper “Thank you, Annette” when you use it. (Okay, just teasing, but . . . I would really love that!) Click this link: Annette’s Percentage of Stretch Chart to download a PDF of your little gift! I included two charts on the PDF so you can share one with a friend.
So, that’s it – now you’re a percentage of stretch expert! It’s an easy method that you can do quickly before you purchase fabric or in the privacy of your own fabric stash. If you have any questions, do let me know!
Sewing with joy,

A Little More: If you like sewing history, click here! It will take you to a post on the Threads Magazine blog honoring Stretch & Sew founder Ann Person, who passed away at 90 a couple of years ago. Quite a lady!
Thanks for the chart. Always handy to have a reminder in the purse.
You’re so welcome, Ginger! I’m glad it looks useful.
Perfect timing. Thank you so much. I recently made two shirts, same pattern different fabrics. and having been trying to find another way to measure stretch.
Hurray! I’m always a fan of good timing. 🙂 Thanks for letting me know, Mona!